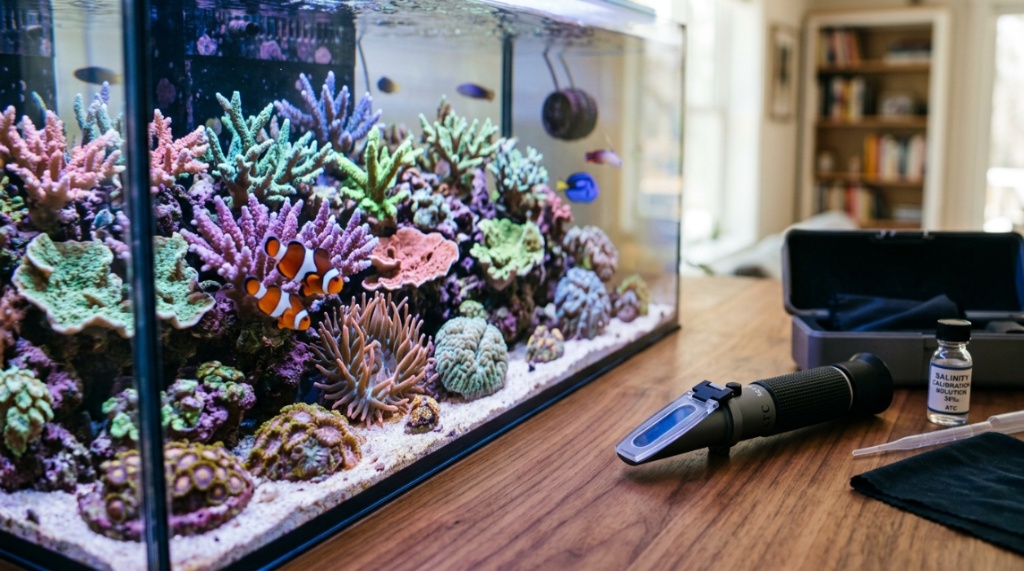
You’ve just spent hours aquascaping your first reef tank. The live rock is perfectly placed, the lights are on a timer, and you’re dreaming of colorful corals. But there’s one silent killer lurking in your tank—incorrect salinity. If you don’t know how to accurately check it, your fish and corals will suffer. Using a reliable salinity tester aquarium tool is the only way to ensure your marine life thrives. This guide will transform you from a guessing hobbyist into a precision-driven aquarist.
What Exactly Is Aquarium Salinity and Why Does It Matter?
Salinity measures the total amount of dissolved salts in your aquarium water, typically expressed in parts per thousand (ppt) or specific gravity (SG). For a saltwater tank, the target is usually 35 ppt or a specific gravity of 1.025. Freshwater tanks should have 0 ppt. Getting this wrong stresses fish, weakens their immune systems, and kills corals. Osmotic pressure forces water into or out of fish cells based on salinity. If your water is too fresh, fish swell; if too salty, they dehydrate. Stability is everything—even a 2 ppt swing can crash a reef tank.
The Quick Science Behind Salinity
Salt dissolves into ions (sodium, chloride, magnesium) that conduct electricity and affect water density. Measuring either conductivity or density gives you your salinity reading. This is why different testers use different physical properties to give you a number.
- Specific Gravity (SG): Ratio of saltwater density to pure water density. 1.025 is reef standard.
- Parts Per Thousand (ppt): Grams of salt per kilogram of water. 35 ppt is natural seawater.
- Conductivity (mS/cm): Electrical conductivity. Higher salt = higher conductivity.
Actionable Takeaway: Pick one measurement unit (SG or ppt) and stick with it. Never mix units when tracking trends.
Which Type of Salinity Tester Should You Use?
You have three main options: a swing-arm hydrometer, a glass float hydrometer, or a digital refractometer. For pro-level accuracy, a digital refractometer wins every time. Swing-arm plastic hydrometers are cheap but notoriously unreliable—they get stuck, develop bubbles, and warp over time. Glass float hydrometers are more accurate but fragile and require a tall water column. A digital refractometer, specifically a good salinity tester aquarium model, gives you instant, temperature-corrected results with 0.1 ppt precision.
| Method | Accuracy | Cost | Ease of Use | Reliability |
|---|---|---|---|---|
| Swing-Arm Hydrometer | Low (±2-3 ppt) | $10-$20 | Easy | Poor |
| Glass Float Hydrometer | Medium (±1 ppt) | $15-$30 | Easy | Fair |
| Digital Refractometer | High (±0.1 ppt) | $50-$150 | Very Easy | Excellent |
Pro Tip: If you have corals or sensitive fish, skip the swing-arm entirely. The $30 saved isn’t worth losing a $200 clownfish pair.
How Do You Take an Accurate Salinity Reading with a Refractometer?
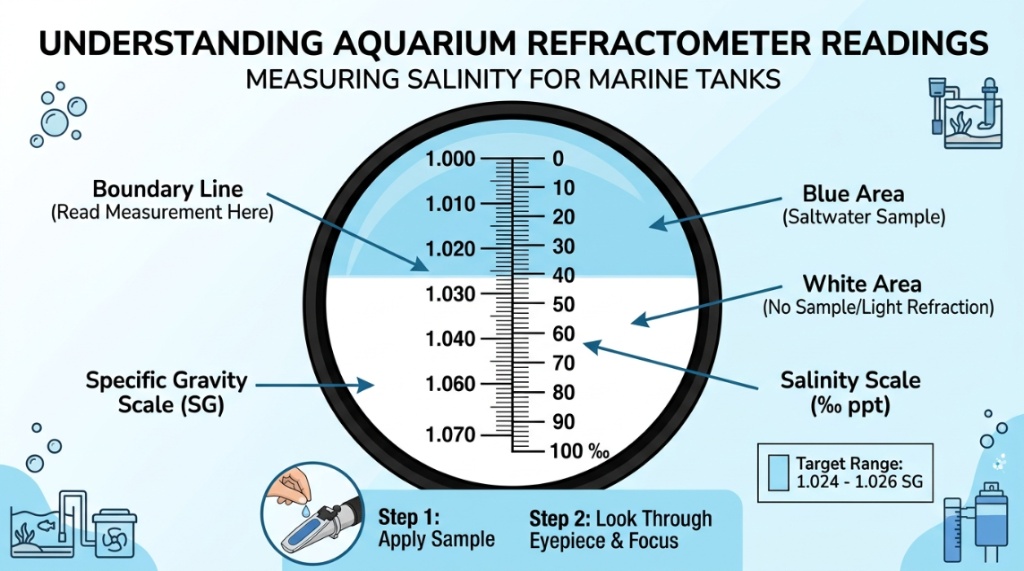
Start by calibrating your refractometer with room-temperature distilled or RO/DI water. Place 2-3 drops on the prism, close the lid, look through the eyepiece toward a light source, and adjust the calibration screw until the blue/white line reads exactly 1.000 SG (0 ppt). Wipe the prism clean with a soft cloth. Now, collect a sample from your aquarium using a clean turkey baster or cup—don’t scoop from the top where evaporation concentrates salt. Place drops on the prism, read the scale where the blue meets white, and record the number.
Common Calibration Mistakes to Avoid
- Using tap water: Tap water has dissolved solids that throw off calibration. Always use distilled or RO water.
- Cold glass: If the refractometer is cold, wait 2 minutes for the sample temperature to stabilize. Temperature affects light refraction.
- Dried salt crystals: Always rinse the prism with RO water between readings. Salt residue skews results.
If your reading shows 1.024 SG but you want 1.025, you need to add salt slowly. Remove 1 cup of tank water, mix in a small amount of salt mix (pre-dissolved in RO water), wait 15 minutes for circulation, then retest. Never dump salt directly into the tank—it burns fish gills.
Why Does Temperature Affect Your Salinity Reading?
Temperature changes water density. Warm water expands and becomes less dense, making a hydrometer float higher and show a lower SG than reality. Cold water contracts, becoming denser, and makes a hydrometer sink lower, showing a higher SG. Most refractometers have automatic temperature compensation (ATC), but basic hydrometers don’t. If your tank runs at 78°F and you calibrate at 68°F room temperature, your reading could be off by 0.002 SG—enough to stress sensitive corals over time.
The Fix: Always let your water sample sit on the refractometer prism for 30-60 seconds before reading. This allows the glass to equalize temperature with the sample. If your hydrometer lacks ATC, use a conversion chart specific to your hydrometer model.
When Should You Check Your Aquarium Salinity?
You should test salinity every time you perform a water change, after topping off evaporation with fresh water, and any time you add new livestock. For established tanks, once a week is sufficient for checking baseline stability. But if you have a nano tank with high evaporation, test every 2-3 days. Evaporation removes only water, leaving salt behind. Over a week, a 10-gallon nano tank can swing from 1.025 to 1.030 SG if you aren’t topping off daily.
- After water changes: Wait 2-3 hours for full mixing before testing.
- After top-offs: Wait 30 minutes for circulation to mix the fresh water.
- After adding salt mixes: Wait 24 hours to confirm stability.
Can You Use a Refractometer for Freshwater Aquariums?
Yes, but with a caveat. Most refractometers are calibrated for seawater (0-100 ppt or 1.000-1.070 SG). For freshwater, you need a salinity reading of 0.00 ppt. If your freshwater tank has medications, adding aquarium salt for disease treatment, or is a brackish setup, a refractometer becomes essential. For pure freshwater with no additives, a cheap TDS (total dissolved solids) meter is more useful. However, if you already own a refractometer, it works fine for freshwater—just make sure you calibrate it with RO water.
Brackish Example: If you keep mollies or puffers that need 10 ppt (SG 1.007), a refractometer is vastly more accurate than guessing with a hydrometer. Those fish are sensitive to sudden swings.
What Are the Most Common Salinity Testing Mistakes?
New aquarists make five main errors. First, not calibrating the refractometer before each use. Even a weekly calibration is enough, but if you drop the unit or it sits unused for months, recalibrate. Second, reading the scale incorrectly—some refractometers show both SG and ppt, and it’s easy to read the wrong scale. Third, using dirty prisms with smudges or salt crystals. Fourth, taking a sample from the surface film where evaporation creates a thin layer of higher salinity. Fifth, trusting a swing-arm hydrometer that’s physically stuck in position.
How to Avoid These: Always calibrate with known 1.000 standard. Rinse with RO between uses. Use a syringe to sample from mid-water column. If your reading seems off, test again immediately—if it changes, something is wrong with your method or equipment.
How Do You Maintain Consistent Salinity Over the Long Term?
Consistency comes from automation and habit. First, install an auto top-off (ATO) system. This device replaces evaporated water with RO/DI water automatically, minute by minute. Without an ATO, your salinity rises all day and drops every time you manually add fresh water. Second, use a calibrated refractometer weekly and log your results. Third, when mixing new saltwater for water changes, let it aerate and mix for 24 hours before adding to the tank. Verify the salinity of new water matches your tank exactly before you pour it in.
Example Routine:
- Sunday morning: Calibrate refractometer.
- Test tank salinity. Log: 1.025 SG.
- Test mix bucket. Log: 1.025 SG. Safe to add.
- Wednesday evening: Quick test after top-off confirms 1.025 still.
- If drift detected, adjust slowly over two days, never more than 0.001 SG per hour.
Which Digital Refractometer Features Matter Most?
When shopping, prioritize automatic temperature compensation (ATC), a wide salinity range (0-100 ppt), and a backlit display for reading in low light. Build quality matters—not all cheap units seal properly against saltwater corrosion. Look for IP65 or better waterproofing. A scratch-resistant sapphire prism is ideal but rare at entry-level prices. The best value for a home aquarist is a mid-range model that includes a calibration screw, storage case, and calibration solution or distilled water reference.
Feature Comparison Quick List:
- ATC (Auto Temp Compensation): Non-negotiable.
- Display Type: Digital LCD with backlight preferred.
- Range: 0-100 ppt (covers freshwater, brackish, reef, and salt mixing).
- Calibration: Easy screw or button calibration.
- Durability: Water-resistant housing (splash-proof).
If you’re unsure which model fits your budget and needs, check a comparison of affordable options like the salinity tester aquarium roundup to see tested units side by side.
How Often Should You Replace or Recalibrate Your Tester?
Recalibrate your refractometer every time you sit down for a testing session if you haven’t used it in over a week. For daily users, once a week is sufficient. Replaceable batteries in digital units last 6-12 months depending on usage—always keep a spare CR2032 battery on hand. The unit itself should last 3-5 years with proper care, but the prism can degrade if scratched or exposed to high heat. If you notice consistent drift of more than 0.002 SG between calibrations, it’s time for a new unit. Dropping the refractometer even once can knock the prism out of alignment permanently.
While maintaining the correct salt levels is vital for coral health, proper water circulation and oxygenation are just as critical. If you are managing multiple quarantine or breeding setups alongside your main marine display, utilizing a Dual Outlet Aquarium Air Pump for Two Tanks ensures both environments receive consistent airflow without cluttering your cabinet with extra cords.”
What Should You Do If Your Salinity Is Dangerously High or Low?
If salinity is too high (above 1.028 SG or 37 ppt), remove some tank water and replace it with fresh RO/DI water slowly. Do not drop more than 0.002 SG per hour to avoid osmotic shock. If salinity is too low (below 1.023 SG or 30 ppt), remove water and replace with freshly mixed saltwater at the correct target salinity. Never add dry salt directly to the display tank. For emergency crashes (fish gasping or corals retracting), perform a 25% water change with matching salinity immediately, then adjust the remaining water volume over the next 4-6 hours.
Emergency Steps:
- Test twice to confirm the reading is real.
- Calculate the volume needed to correct. Example: 50-gallon tank at 1.030 needs to go to 1.025. Remove 10 gallons, replace with RO water. Retest after mixing.
- Monitor fish behavior for 30 minutes post-change.
- Log the event and check again in 12 hours.
Frequently Asked Questions
Can I use a pool salt tester for my aquarium?
No. Pool testers measure chlorine and pH, not salinity. They cannot measure the actual dissolved salt content required for marine life. Always use a refractometer or hydrometer designed for aquarium or seawater use.
Is specific gravity the same as salinity?
No, but they are directly related. Specific gravity is density relative to pure water, while salinity is the actual weight of salt. Most aquarium references treat them interchangeably, but you must know which scale your tester uses. A conversion of 1.025 SG equals roughly 35 ppt.
How long does mixed saltwater stay stable before use?
Freshly mixed saltwater is stable for up to 48 hours if continuously aerated and covered to prevent evaporation. After 48 hours, test salinity and pH again before use. Do not store mixed saltwater for more than a week—bacteria growth and precipitation can alter chemistry.
Why does my digital refractometer show different readings than my friend’s hydrometer?
Different technologies have different accuracy. Your digital refractometer is likely correct within ±0.1 ppt, while a plastic swing-arm hydrometer can be off by 2-3 ppt. Trust the refractometer, but always calibrate it first. If both are calibrated correctly, readings should match within 0.001 SG.
Can I calibrate my refractometer with bottled water?
Distilled or RO/DI bottled water is fine. Avoid spring water, mineral water, or tap water—they contain dissolved solids that will give you a false 1.000 baseline. Check the label for distilled
or purified by reverse osmosis
.
How much does temperature affect a handheld refractometer with ATC?
ATC (automatic temperature compensation) works reliably between 50°F and 86°F. Outside that range, accuracy degrades. If your tank room is very warm or cold, let the unit acclimate to room temperature for 10 minutes before calibrating.
Do I need to clean my refractometer after every use?
Yes. Salt residue left on the prism will crystallize and scratch the glass or corrode the seal. Wipe with a soft, damp cloth after each use, then dry with a microfiber cloth. Store in its case to protect from dust and moisture.
Conclusion
Checking aquarium salinity is not a complicated task, but it demands the right tool and a consistent process. A reliable refractometer removes the guesswork, protects your livestock, and gives you peace of mind. You now have the step-by-step knowledge to take accurate readings, avoid common mistakes, and maintain a stable environment for your fish and corals. Don’t rely on a cheap hydrometer that could fail when you need it most. Invest in a quality digital refractometer, make it part of your weekly routine, and your tank will reward you with vibrant, healthy life. Start testing smarter today—your fish are counting on you.


