Black nail art remains one of the most versatile and striking choices for anyone looking to make a bold statement. Moreover, using a dotting tool can transform simple black polish into intricate designs that look professionally done. Whether you’re a beginner or an experienced nail artist, mastering dotting tool techniques opens up endless creative possibilities for stunning black nail designs.
Understanding the Basics of Dotting Tools
Dotting tools are essential instruments in any nail art kit. They typically feature two ends with different sized balls, allowing you to create various dot sizes. Additionally, these tools are incredibly affordable and easy to find at beauty supply stores or online retailers.
The beauty of dotting tools lies in their simplicity. You simply dip the ball end into nail polish and transfer it onto your nail surface. However, the technique requires a steady hand and some practice to achieve consistent results. Therefore, starting with basic patterns before moving to complex designs is highly recommended.
Preparing Your Nails for Black Design Success
Proper preparation ensures your black nail art looks flawless and lasts longer. First, start by cleaning your nails thoroughly and pushing back your cuticles. Next, file your nails into your desired shape, whether that’s square, round, or almond.
Apply a base coat to protect your natural nails from staining. Black polish can be particularly stubborn to remove, so this step is crucial. Furthermore, a good base coat creates a smooth surface for your design work. Allow the base coat to dry completely before moving forward with your black design.
Classic Black Polka Dot Designs
Polka dots represent the most fundamental dotting tool technique. Start by applying a base color of your choice. White, nude, or even metallics create stunning contrasts with black dots. Once your base color is completely dry, dip your dotting tool into black polish.
Create evenly spaced dots across your nail surface. The key is maintaining consistent pressure for uniform dot sizes. Additionally, you can vary the dot sizes by using different ends of your dotting tool. This creates visual interest and dimension in your design.
For a modern twist, try creating gradient dot patterns. Place larger dots near the cuticle and gradually decrease the size toward the tip. This technique adds sophistication to a simple design. According to Allure’s nail art guide, varying dot sizes creates more dynamic and professional-looking results.
Creating Elegant Black Floral Patterns
Floral designs using dotting tools are easier than they appear. Begin with a base coat in your chosen color. Once dry, use your dotting tool to create five dots in a circular pattern for each flower. The dots should touch slightly at their bases to form petals.
Add a contrasting dot in the center of each flower for added detail. You can use white, gold, or silver for the centers. Furthermore, create small leaves by making elongated dots or combining two small dots together. This technique works beautifully on accent nails or across all fingers.
Black flowers on a nude or pastel background create an elegant, sophisticated look. However, you can also reverse this by creating white or colored flowers on a black base. The contrast makes the design pop dramatically.
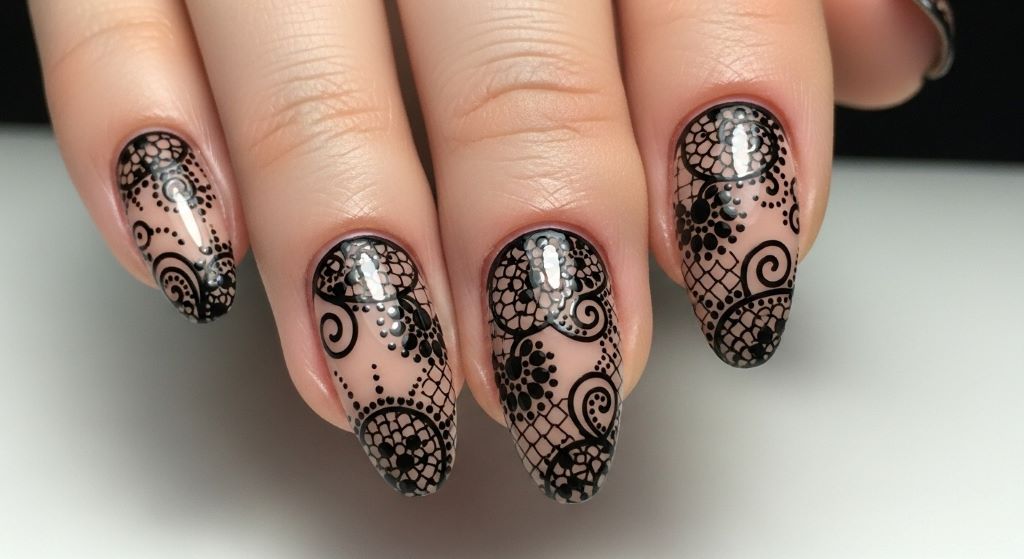
Mastering the Black Lace Effect
Lace patterns add romance and elegance to black nail designs. Start with a light base color such as white, cream, or soft pink. Once completely dry, use your finest dotting tool to create intricate lace patterns along the nail edges.
Create small connected dots that form delicate swirls and curves. Additionally, you can reference actual lace patterns for inspiration. The key is maintaining light, consistent pressure to create uniform dots that flow together naturally.
This technique requires patience and practice. Therefore, start with simple lace borders before attempting full nail coverage. The result is a stunning, feminine design perfect for special occasions or weddings.
Abstract Black Art with Dotting Tools
Abstract designs offer creative freedom and unique results every time. Apply your base color first, allowing it to dry completely. Then, randomly place black dots of varying sizes across your nails. You can cluster them together or spread them out for different effects.
Combine dotting with other techniques like dragging or swirling. Use a thin brush or toothpick to connect some dots, creating organic flowing patterns. Furthermore, you can layer dots of different sizes on top of each other for added dimension.
Abstract designs are forgiving because there’s no right or wrong pattern. This makes them perfect for beginners who want to experiment without worrying about perfection. However, stepping back occasionally to view the overall effect helps maintain balance across all nails.
Black Galaxy and Celestial Designs
Galaxy nails have become incredibly popular in recent years. Start with a black base coat covering the entire nail. Once dry, use a makeup sponge to dab on dark blue, purple, or deep pink polish in random areas.
Use your dotting tool to add white or silver stars throughout the design. Vary the sizes to create depth and realism. Additionally, you can create small clusters of tiny dots to represent distant star systems. Cosmopolitan’s nail tutorial section offers excellent visual examples of celestial designs.
For added dimension, apply a shimmer top coat or add small rhinestones. This creates a truly cosmic effect that catches light beautifully. The combination of dotting tool stars with sponged backgrounds creates professional-looking galaxy nails.
Geometric Black Patterns and Lines
Geometric designs bring modern edge to black nail art. Use your dotting tool to create perfectly placed dots that form lines, triangles, or other shapes. Start by mapping out your design mentally or with a light pencil mark.
Create dot lines by placing dots close together in straight or curved patterns. These can frame the nail, create chevrons, or form abstract geometric shapes. Furthermore, combining different dot sizes within geometric patterns adds visual interest.
Negative space designs work particularly well with black geometric patterns. Leave portions of your natural nail or base color visible between black dotted shapes. This contemporary approach looks incredibly sophisticated and fashion-forward.
Tips for Perfect Dotting Tool Technique
Achieving flawless dots requires understanding a few key techniques. First, always wipe excess polish from your dotting tool before applying it to your nail. Too much polish creates messy, irregular dots. Additionally, clean your dotting tool frequently between applications using nail polish remover.
Work with polish that has the right consistency. Polish that’s too thick creates raised, bumpy dots. However, polish that’s too thin spreads unpredictably. Therefore, standard polish consistency straight from the bottle usually works best.
Practice your pressure control on paper before working on your nails. Light pressure creates smaller, flatter dots while heavier pressure produces larger, more raised dots. Consistency in pressure is key to professional-looking results.
Troubleshooting Common Dotting Tool Problems
Even experienced nail artists encounter challenges with dotting tools. If your dots appear irregular, the polish consistency might be wrong. Adding a drop of nail polish thinner can help. However, be cautious not to make the polish too runny.
Smudged designs often result from working on wet base layers. Always ensure each layer is completely dry before adding dots. Furthermore, using a quick-dry top coat between layers can speed up the process significantly.
If dots won’t transfer from your tool to your nail, the tool might be too dirty or the polish too thick. Clean your tool thoroughly and test the polish consistency on paper first.
Sealing and Protecting Your Black Design
Finishing your design properly ensures it lasts. Apply a high-quality top coat over your completed design, being careful not to smudge the dots. Wait at least ten minutes after completing your dotting work before applying the top coat.
Use a generous layer of top coat, sealing the edges of your nails completely. This prevents chipping and extends the life of your design. Additionally, reapply top coat every few days to maintain shine and protection.
Consider using a quick-dry top coat if you’re impatient. These products significantly reduce waiting time. However, even quick-dry formulas need a few minutes to set properly before you resume normal activities.
Conclusion
Mastering black nail art with dotting tools opens up a world of creative possibilities. From simple polka dots to intricate lace patterns and celestial designs, these techniques are accessible to everyone. Moreover, with practice and patience, you can create salon-quality designs at home. Remember to prepare your nails properly, maintain consistent pressure, and seal your work with a quality top coat. Therefore, grab your dotting tools and start experimenting with these beautiful black design techniques today.
Frequently Asked Questions
What size dotting tool should beginners start with?
Beginners should start with a medium-sized dotting tool, typically around 2-3mm. This size is versatile enough for most basic designs and easier to control than very small or very large tools. Additionally, purchasing a set with multiple sizes allows you to experiment as your skills develop.
How do I prevent black polish from staining my nails?
Always apply a quality base coat before using black polish. This creates a protective barrier between your natural nail and the pigmented polish. Furthermore, avoid leaving black polish on for extended periods, and use a nourishing cuticle oil regularly to maintain nail health.
Can I use a toothpick instead of a dotting tool?
While toothpicks can work in a pinch, they don’t create the same consistent, smooth dots as proper dotting tools. Toothpicks are wooden and absorb polish, making them less precise. However, they can be useful for very fine detail work or connecting dots into designs.
How long should I wait between applying dots?
Wait until your base layer is completely dry before adding dots, which typically takes 5-10 minutes. When layering dots on top of each other, allow each layer to dry for at least 2-3 minutes to prevent smudging and maintain crisp edges.
What’s the best way to clean dotting tools?
Wipe your dotting tool with a lint-free cloth saturated with nail polish remover after each use. For stubborn buildup, soak the tool in remover for a few minutes. Additionally, always clean your tools immediately after finishing your nail art to prevent polish from hardening on the metal balls.
Related Topics: